Is your File Explorer not refreshing automatically in Windows 10/11? Don’t worry, you’re not alone.
Many users face this issue, and it can be quite frustrating. File Explorer is a vital tool for managing files on your computer. When it doesn’t refresh automatically, it disrupts your workflow. You may not see new files, changes, or deleted items right away.
This can cause confusion and slow you down. Fortunately, there are several ways to fix this problem. In this blog post, we’ll explore effective methods to get your File Explorer refreshing automatically again. Whether you’re a tech novice or an experienced user, these solutions are easy to follow and can save you a lot of hassle. Let’s dive in and fix this issue together.

Check For Windows Updates
One common issue in Windows 10/11 is File Explorer not refreshing automatically. This can be frustrating, but checking for Windows updates can often fix the problem. Keeping your system updated helps ensure smooth performance and resolves many bugs.
Install Pending Updates
First, make sure your Windows is up-to-date. Follow these steps:
- Click on the Start menu.
- Go to Settings.
- Select Update & Security.
- Click on Windows Update.
- Press Check for updates.
If there are any pending updates, install them. These updates can include important patches and fixes that can solve the File Explorer issue.
Restart After Update
After installing the updates, it is crucial to restart your computer. A restart will complete the update process and apply the fixes.
- Click on the Start menu.
- Select Power.
- Click on Restart.
Once your system restarts, check if File Explorer is refreshing automatically. This simple step can often resolve the issue.

Restart Windows Explorer
Sometimes, File Explorer on Windows 10/11 does not refresh automatically. This can be frustrating. One quick fix is to restart Windows Explorer. This can resolve many small issues within the system.
Use Task Manager
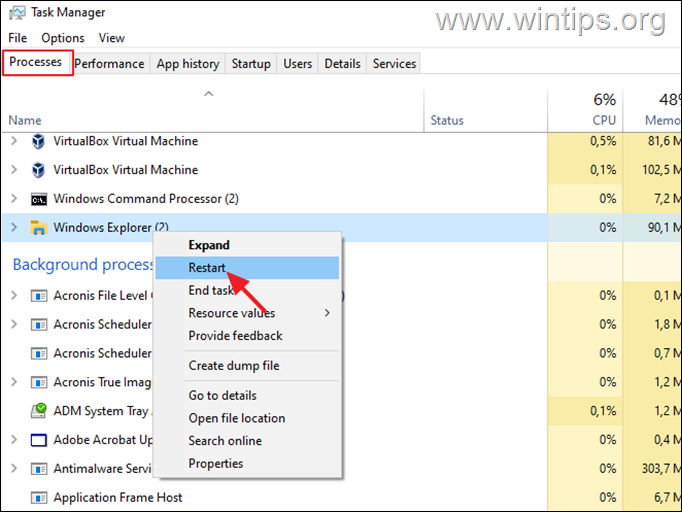
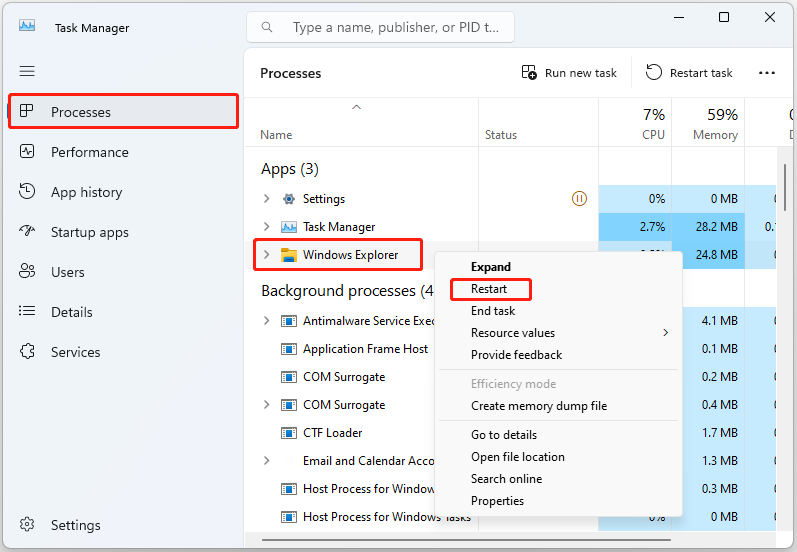
You can restart Windows Explorer using the Task Manager. Follow these steps:
- Press Ctrl + Shift + Esc to open Task Manager.
- Click on the Processes tab.
- Find Windows Explorer in the list.
- Right-click on it and select Restart.
This will restart Windows Explorer. It should fix the refresh issue in File Explorer.
Command Prompt Method
Another way to restart Windows Explorer is through the Command Prompt. Here’s how:
- Press Windows + R to open the Run dialog.
- Type
cmdand press Enter. - In the Command Prompt, type
taskkill /f /im explorer.exeand press Enter. - Then, type
start explorer.exeand press Enter.
This method will also restart Windows Explorer. It can solve the auto-refresh problem in File Explorer.
Modify Folder Options
File Explorer might not refresh automatically in Windows 10/11. One effective fix is to modify the folder options. This will ensure that File Explorer updates correctly. Follow the steps below to access and modify the folder options.
Access Folder Options
First, open File Explorer. Click on the “View” tab at the top.
- In the “View” tab, find and click on “Options”.
- This will open the “Folder Options” window.
Another way to access Folder Options is through the Control Panel:
- Open the Control Panel.
- Navigate to “Appearance and Personalization”.
- Click on “File Explorer Options”.
Enable Automatic Refresh
In the “Folder Options” window, go to the “View” tab.
- Scroll down to find the option “Automatically update folder views”.
- Check the box next to this option.
- Click “Apply”, then “OK” to save changes.
This will enable automatic refresh in File Explorer.

Clear File Explorer Cache
One of the common issues in Windows 10/11 is File Explorer not refreshing automatically. This can be frustrating. A practical solution is to clear the File Explorer cache. Here’s how to do it:
Delete Thumbnail Cache
Thumbnail cache helps in loading images faster. But it can cause issues if corrupted. Follow these steps to delete the thumbnail cache:
- Press Windows key + R to open the Run dialog box.
- Type
cleanmgrand press Enter. - Select the drive where Windows is installed (usually C:).
- Click OK to proceed.
- Check the box next to Thumbnails.
- Click OK and then Delete Files.
This will delete the thumbnail cache and may fix the issue.
Reset Folder View Settings
Resetting the folder view settings can also help. Here’s how:
- Open File Explorer and click on the View tab.
- Click on Options and then Change folder and search options.
- In the Folder Options window, click on the View tab.
- Click Reset Folders to reset all folders to their default settings.
After resetting, check if File Explorer refreshes automatically.
| Step | Action |
|---|---|
| 1 | Open Run dialog with Windows key + R |
| 2 | Type cleanmgr and press Enter |
| 3 | Select drive and click OK |
| 4 | Check Thumbnails and click Delete Files |
Clearing the File Explorer cache can solve the auto-refresh issue. Try these steps and see the difference.
Disable Third-party Extensions
One common issue in Windows 10/11 is File Explorer not refreshing automatically. This can be frustrating when trying to organize or access files. One potential solution is to disable third-party extensions. These extensions can cause conflicts, leading to the problem. Let’s explore how to identify and disable problematic extensions.
Identify Problematic Extensions
First, you need to identify which third-party extensions might be causing the issue. Use the Task Manager to see running extensions. To open Task Manager, press Ctrl + Shift + Esc. Go to the Startup tab and look for any unfamiliar extensions.
| Step | Action |
|---|---|
| 1 | Press Ctrl + Shift + Esc |
| 2 | Go to the Startup tab |
| 3 | Identify unfamiliar extensions |
It’s also helpful to check the list of installed programs via Control Panel. Click on Programs and then Programs and Features. Look for any extensions you do not recognize.
Disable Or Uninstall Extensions
Once you identify the problematic extensions, you can disable or uninstall them. Disabling them in Task Manager is a quick solution. Right-click the extension and select Disable.
- Open Task Manager with Ctrl + Shift + Esc
- Go to the Startup tab
- Right-click the extension
- Select Disable
For a permanent solution, uninstall the extension through the Control Panel. Follow these steps:
- Open Control Panel
- Click on Programs and Features
- Find the extension
- Click Uninstall
This should resolve the issue of File Explorer not refreshing automatically. Restart your computer to apply changes. This ensures all extensions are fully disabled or removed.
Check System Files
File Explorer not refreshing automatically in Windows 10 or 11 can be frustrating. One possible cause is corrupted system files. Ensuring the integrity of your system files can help resolve this issue. Here, we will discuss how to check system files to fix the problem.
Run System File Checker
The System File Checker (SFC) tool scans and repairs corrupted system files. Follow these steps to run SFC:
- Press Win + X and select Windows Terminal (Admin).
- In the terminal, type
sfc /scannowand press Enter. - Wait for the scan to complete. It may take some time.
- If any corrupted files are found, SFC will repair them automatically.
Use Dism Tool
DISM (Deployment Imaging Service and Management Tool) can fix more serious issues. Follow these steps to use the DISM tool:
- Open Windows Terminal (Admin) by pressing Win + X.
- Type
DISM /Online /Cleanup-Image /CheckHealthand press Enter to check for corruption. - If corruption is found, type
DISM /Online /Cleanup-Image /ScanHealthand press Enter to scan for issues. - To fix any issues, type
DISM /Online /Cleanup-Image /RestoreHealthand press Enter. - Wait for the process to complete. This may take some time.
- Restart your computer to apply the changes.
By checking and repairing system files, you can resolve File Explorer issues. Both SFC and DISM tools are effective for this purpose.
Frequently Asked Questions
Why Is File Explorer Not Refreshing Automatically In Windows 10/11?
File Explorer might not refresh due to system bugs, outdated drivers, or corrupted files.
How Can I Manually Refresh File Explorer?
Press F5 or right-click the window and select “Refresh” to manually refresh File Explorer.
Does Restarting Windows Fix File Explorer Refresh Issues?
Yes, restarting Windows can sometimes fix the issue by resetting system processes.
Can Updating Windows Fix The File Explorer Refresh Problem?
Yes, updating Windows can resolve bugs and improve system performance, including fixing File Explorer issues.
What Steps Should I Take To Troubleshoot File Explorer?
Update Windows, check for driver updates, run system scans, and restart your computer to troubleshoot.
Conclusion
Fixing File Explorer not refreshing can be simple. Follow these steps carefully. Your computer will run smoother. No more frustration with stale windows. Regular updates help avoid similar issues. Keep your system clean and organized. Enjoy a more efficient Windows experience.

